Showing posts with label Nurseries / Playrooms. Show all posts

Tuesday, March 5, 2013

New Designs! Now I know my ABCs

With an alphabet twist...

It has been a busy busy start to the year! I wanted to share some new and recent designs that we have added to the collection with an alphabet focus.

Most recently we have added the ABC prints featuring the tranpsortation series in fully customizable colors.

Great for the Nursery:


And even awesomer (yes I did just invent that word) in the playroom:


Lots of different color options too:


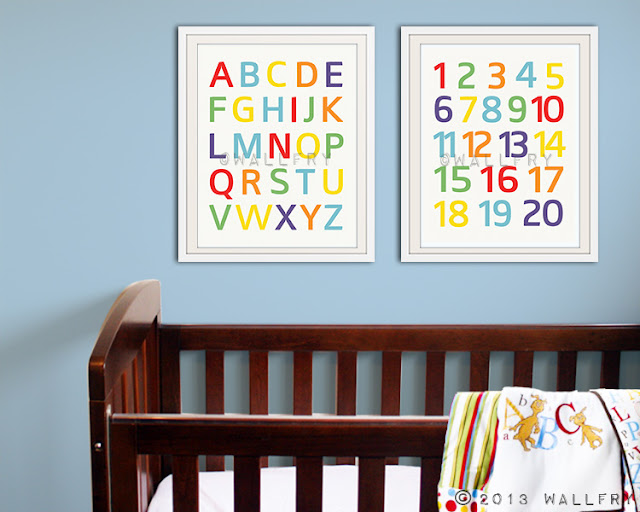
We have had so many requests for a simple, modern alphabet and numbers prints and here they are:


Different color options to choose from too!

Thursday, January 12, 2012

Picking colors that Pop!

The WallFry Inspiration Cliche Prints have been HUGELY successful. So many customers are using the oppotunity to customize the color of their prints to be able to pick colors from their bedding or decor to tie the room together. Here are some examples for the nursery or kids room:


I love how this really makes key colors in the room Pop! Customers have been able to choose their favorite inspiration quotes too from the full selection:


Such an easy way to customize your special little one's space just the way you want it!

Friday, September 23, 2011

Nursery Cliche Print

For those parents with a sense of humor, or who just want to say it all:


Keep calm and cliche on....

Thursday, September 22, 2011

NEW - Prints with quotes

WallFry has more new prints with heartwarming quotes for the little ones. I think they are pretty cute:


Heaps more where that came from in the shop.

While I am on the topic of NEW products there are heaps of personalized prints now available too. I have been working to get these ready in time for Christmas as they would make such gorgeous personalized gifts for kids:


Saturday, September 10, 2011

New Product - Owl Print

I have just added a new print to the Woodland Series. I think it is pretty adorable, so wanted to share it:


The little owl now joins his friends the fox, squirrel, rabbit and bear:


I am still working on more animals to add to this popular series. I think either a deer or racoon next.....

Thursday, August 4, 2011

Nursery Design by a Real Mom

I love how clean, light and simple this nursery is... and so effecitve:


This wonderful WallFry customer was inspired to have all her pets custom painted and displayed in her new little one's nursery. Each of these canvases is a custom painting of one their very own pets. Such a fun idea and I love how they tie in with the decor of the room

I can see this new baby being very happy in this space for years to come.

Monday, August 1, 2011

Chevron Nursery Design

Thanks for stopping by. We're in the process of shifting our blog. The post you were looking for can be found here: http://www.wallfry.com/blog/chevron-nursery-design.html

Monday, July 4, 2011

New Print - Owls in a Tree

I just listed this new print from my original painting, Owls in a Tree! I love the blues and browns, they would be perfect for any owl loving boy or girl.

Sunday, June 26, 2011

Does your Art match your Nursery?

Oh no! This page has moved. And we're not technical enough to make it automaticall redirect, so you can find this post here.

Monday, June 20, 2011

DIY Personalized Wall Letters

One of the biggest selling items in my nursery art store WallFry are the custom, personalized Wall Letters. They are different from a lot of the other wall letters for children, in that you only need one! They are perfect for hanging on the door to a child's room (this is where I have the letters for each of my boys) as a name sign, above a bed or even sitting on a shelf.

How does it work? I make the first letter of your child's name with their name on the letter:


This is such a popular and unique concept and yet simple and straight-forward to make. It is a little bit fiddly and if you are like me, your hands will get a bit dirty, but they can be fun to make. So here is a step-by-step tutorial with pictures on how to make your own personalized letter:


What you will need:
  • Papier Mache letter - in Australia, I buy mine from Spotlight, but similar letters can be purchased from any number of craft stores including the Hobby Lobby or Joann.
  • Colorful paper - there are some beautiful gift wrapping papers out there which work really well. I also use vectors which I can match to my customer's decor and print off myself.
  • Mod Podge - this like a decoupage/glue sealant that I use as an adhesive and sealant for protection. If you know a similar product then you are welcome to try it. I use the matte.
  • Acrylic Paint - in the colors of your choice.
  • Craft Letter Stickers - I use foam alphabet stickers that are actually intended for children's crafts. You can get something similar at any craft store.
  • Standard crafting supplies - scissors, pencil, ruler, paint brushes, fine sand-paper etc
How to do it:

The first step is to paint your letter in the color of your choice.
TIP - I find it works best if you pick a color from your patterned paper so that it is coordinated. If there are any bumps on the papier mache use a fine grade sand-paper to gently sand them back first:


Paint both sides and once it is dry you can attach your paper to the sides. I use Mod Podge for this (although I am sure you could use any crafting glue).
TIP - apply the Mod Podge to the side of the letter then attach the paper, don't be tempted to put the glue on the paper first (otherwise it will curl up and be harder to manage):


Once you have attached the paper to all the sides, allow it to dry. Once it is dry I then seal the whole thing (over the paper sides and painted faces) with Mod Podge. This protects it, stops the paper peeling away over time and gives it a nice finish. Mod Podge goes on milky, but dries clear so don't be concerned by this (I was a little bit the first time!). Just make sure it is smooth and consistent, then allow it to dry:


Once the Mod Podge is dry, you are ready to attach your letters for the name. Peel off the backing first (if there is one) and glue it on.
TIP - even though the letters I use are stickers, I secure them on firmly using a PVA glue.


TIP - These types of foam letters come in a range of colors, but if yours don't match the color scheme that you have chosen, you can paint them in advance using acrylic paint. This can be a little fiddly so if you can get away with the letters as-is then I encourage you to do so. I do paint the foam letters most of the time, to get the best color match.

I then paint the foam letters with Mod Podge for extra protection but this is not necessary unless you want to.

Here are some examples of the finished product, your options are endless:


Or you can add embellishments, as well as or instead of the name:


I sell them with a small 'A' hook at the back but don't find it necessary for the ones that I have used in my own home. As they are very light, I adhere them to the wall with Blu Tak (removable adhesive putty).

These are a fantastic gift idea for:
  • Baby Showers
  • Newborns
  • Kids Birthdays
  • Naming Days
  • Christmas etc
I have even used them for ABC letters in the kid's playroom:


Have Fun!

Friday, June 17, 2011

So Sophisticated!

You may already be familiar with hoolaboola, a fabulous nursery design blog which has provided inspiration to many in those months leading up to and after the birth of your baby. I especially love their 'Get the look' section which shares great inspiration and ideas, whatever your color preferences and choices, and puts them all together on a design board.

I was so excited when I stumbled accross this:


It's fantastic to be able to see someone elses nursery vision, especially when it includes art by WallFry .


So cool (or should I say Sophisticated?)! A whole design board dedicated to art by WallFry! You should check hoolaboola out

Monday, June 13, 2011

Nursery Design by a Real Mom

We're sorry - we have updated our blog and this content has moved. You can now find it here.

Thursday, January 6, 2011

Pimp My Play Room

As the boys are getting older we are very quickly starting to run out of space in their play area / rumpus room. It is a space off to one side of the living area, not huge but it should be plenty big enough for two little guys. So it was time to organise and, better still, decorate! And to do so with a budget in mind.

It was important for it to be bright, fun, colourful and functional so that the kids could identify it as their own space. But with such close proximity to shared living areas it also had to be organised, neat, tidy and easy to keep that way.

The only major purchase was the shelving:


We purchased the shelves at Officeworks although they didn't sell this particular set online and we had to go instore. If there is not an Officeworks near you, they sell very similar shelves at Ikea reasonably priced. I loved the colourful baskets. They are ideal for storage, with things that the boys can access down low and those they can't, or shouldn't, up higher. They are easy for them to use too and Harvey, who is only 2 can get them out, play with their contents, pack up and put them away (although he never does). He much prefers to empty one and carry it around pretending it is a washing basket when he is helping me with the washing.

Although we have discovered there are other uses:


On one side is an old sofa bed that we have had for ages, so we don't need to worry about messes. It is also great to have for that unexpected extra guest to stay over. I have decorated it with some toys, cushions and a beautiful quilt using Michael Miller fabrics that my Mother made for Harvey when he was born:


On the other side, for extra storage, we put drawers that were previously bought from Ikea which I have covered with colourful fabrics. I plan to post a tutorial on how to cover drawers like this in fabric in the near future, so stay tuned:


Above the drawers I have hung a set of the Dog Series paintings from my nursery art store WallFry. I did originally paint them for the store, but fell in love with them so have left them hanging on the playroom wall:


I am going to make some of the papier mache letters that I also have in my store to coordinate with the colours in the baskets and will post pictures of the finished results soon.

So far the playroom is living up to its expectations. It is bright, fun, colourful and functional and I am finding that even with a 2 year old and an 11 month old, it is a lot easier to keep tidy and organised. The kids seem to love it too:


Related Posts Plugin for WordPress, Blogger...