
Showing posts with label DIY / Tutorials. Show all posts
Showing posts with label DIY / Tutorials. Show all posts
Sunday, February 15, 2015
DIY Wooden Name Blocks


Wednesday, February 4, 2015
Making an octopus dip
We've moved our blog around! You can now find this post here. (Sorry about that)
Tuesday, October 21, 2014
Make your Own Creepy Eyes!
We're changing our blog around a bit - you can still find this story here: http://www.wallfry.com/blog/make-your-own-creepy-eyes.html
Sunday, October 5, 2014
Make Your Own Monster Eyes
We're moving the blog around - the post you are looking for can now be found here: http://www.wallfry.com/blog/diy-monster-eyes.html
Tuesday, July 29, 2014
Hand Print Bouquet - DIY Tutorial
My mother had surgery recently and my kids wanted to send their Nana some flowers while she was in hospital. Now while flowers are a lovely thing to receive, they can be quite expensive and let's face it, they die! My mother is also highly allergic so it was an all round bad idea.
So I took some inspiration from a Mother's Day gift one of my boys had made for me at kinder this year and together the kids and I made her this gorgeous hand-print bouquet:

It was so easy to do and the kids could get involved as well, which they just loved. Here are some tips that I learned through the process:


Once you have all yourflowers hand/foot prints you can then arrange them.
Work out your bouquet / paper sizes first so you know what you are working with. This can be done on a large scale (ours was pretty big on an A2+ piece of card) or much smaller (the one I received from kinder was on an A3 size).
Then get to arranging to get the look you are going for:


As you can see the hand prints don't need to be perfect or uniform either.

So I took some inspiration from a Mother's Day gift one of my boys had made for me at kinder this year and together the kids and I made her this gorgeous hand-print bouquet:
It was so easy to do and the kids could get involved as well, which they just loved. Here are some tips that I learned through the process:
- Hand prints work best when you paint the hand and they then stamp the paper with it. Dipping in a tray of paint might sound like a good idea... it wasn't.
- While you can use whatever color scheme you like, I found it easier to keep it to one color per child (they chose their colors). That way I (and Nana later on) could identify which hand print belonged to which child.
- I now know that it is near impossible to get a hand print from an 8 month old. Foot prints, while still difficult to get without help (shout out to my very helpful 5 year old) were much easier and looked great mixed in with the hand prints for a bit of added interest.
- I added the 'leaves' for a bit of color and authenticity. The boys and I just cut these from colored paper.
- When the kids go to wash the paint off their hands, make sure that they don't make a stop at the toilet on the way because they 'forgot' (we won't mention any names). You will find paint in places you didn't know it was possible for paint to go.
- The hand / foot prints don't need to be cut out perfectly. The rough border makes them quicker and easier to cut, it keeps them sturdy and it means that the kids can get involved and help with the cutting too. I also like the effect.
Once you have all your
Work out your bouquet / paper sizes first so you know what you are working with. This can be done on a large scale (ours was pretty big on an A2+ piece of card) or much smaller (the one I received from kinder was on an A3 size).
Then get to arranging to get the look you are going for:
- I just used Clag (paste for paper and card) to stick them on but any craft type glue would work, it doesn't need a super-hold.
- It might be hard to visualise what the flat arrangement will look like when pulled into a cone shape. I kept picking mine up and curling it to get a better idea.
- I also liked letting the hand prints stick up over the card base to give more of that 'flower' effect.
- Once you are done and your glue is dry you just pull your base card paper around at the bottom into a cone/bouquet shape and stick (or staple for a stronger hold).
- I then also used a contrasting colored paper wrapped around the bottom of the bouquet, florist style' to hide my joins, which I thought was a nice effect.
My mother absolutely loved this gift and I did too when I received my smaller version. It is thoughtful, hand-made, representative of the kids / grandkids and is something to treasure for longer than the usual week that actual flowers last.
This is a super-easy DIY that the kids can get involved with, which makes it all the more special for the receiver. It would be a perfect gift for Mother's Day, a get well gift, or any gift for a mother or grandmother who cherishes their children.
Tuesday, July 15, 2014
Showstopper Superhero Party
What is it with superheroes?
My 3 year old son had never seen a superhero TV show or movie, had never read a comic or book, had never seen a superhero in action at all and yet he desperately wanted a superhero birthday party for his 4th birthday (well he actually wanted a 'Spiderman' party but we gently suggested that it might be nicer for guests, not to mention easier for us if we included all heroes of the super nature).
This was the first party that he was really old enough to choose for himself so what master 3 turning 4 wants, he gets (well he got the party anyway). It was really hard to find inspiration for superhero parties on the Internet so I thought I would share our very easy, low cost DIY superhero party! It was a great success with some showstopper moments.

This was my first real 'theme' birthday party and I had so much fun with the planning and organising. Everything was kept pretty low-budget and DIY - most of these kids were only 3 or just turned 4 so we kept the focus on making it as fun as possible without too much fuss.

I resorted to the classic party game staples with a superhero twists:
The kids DID have fun with these games, BUT the most memorable thing about this party was a personal visit from Spiderman himself.

...yes, that is my husband in a Spiderman suit (purchased online for a very reasonable price). You may not have been fooled but the kids sure were and they were SO excited that the 'real' Spiderman had come to Harvey's party.
The celebrity visit was planned perfectly and came off without a hitch.
First we called out to the playing kids that Spiderman had called us on the 'spider phone' and needed all the 'creepy crawlies' cleared from the yard. This then segued into a scavenger hunt for little plastic bugs and critters that had been strewn around the yard in advance. They had to fill a central container with the bugs (teamwork) and when they did there would be a surprise at the end. The kids loved the scavenger hunt, but we keep finding those little plastic bugs, frogs and snakes throughout the garden which has caused a sharp intake of breath on more than one occasion.
Once the container was full, the Spiderman theme song started playing and in ran Spiderman (husband took the opportunity to get changed in secret while the scavenger hunt was on). He had cans of 'silly string' and sprayed 'spider web' all over the kids. They were overcome with squeals of delight.
Spiderman was on a timeframe, that suit was hot (not to mention a little tight) so we had an activity planned. The little superheros were going to have to cross an obstacle course, lead by Spiderman, so that they could return to head quarters and enjoy the birthday meal. We used slides and swings and crawl tunnels etc, just toys and play equipment that we already had.
Once the obstacle course was successfully crossed by all little superheros they sat down to eat a birthday lunch. Spiderman had a (very small) gift for them all before doing a magic trick (using his superhero powers of course) before he left.
The magic colored water trick was the easiest, most effective thing to do and it blew the kids minds. Spiderman announced he was going to fill their water jug with 'magic spider water', then took a jug of clear water and poured it into another jug at which point it turned blue - cue the gasps of amazement and pure awe from the kids. The trick is to put the smallest amount of food coloring in the bottom of the second jug. The kids don't see it as they are paying too much attention to Spiderman and from their perspective the water just turns blue by magic (you will need 2 clear jugs for full effect).
In the wake of the awe of 12 tiny superheroes, Spiderman then made his exit. The party was a huge success.

My kids still think the real Spiderman came to Harvey's 4th birthday and although I am sure they will work it out eventually they currently think it was the coolest thing in the world. Thanks Spiderman.
My 3 year old son had never seen a superhero TV show or movie, had never read a comic or book, had never seen a superhero in action at all and yet he desperately wanted a superhero birthday party for his 4th birthday (well he actually wanted a 'Spiderman' party but we gently suggested that it might be nicer for guests, not to mention easier for us if we included all heroes of the super nature).
This was the first party that he was really old enough to choose for himself so what master 3 turning 4 wants, he gets (well he got the party anyway). It was really hard to find inspiration for superhero parties on the Internet so I thought I would share our very easy, low cost DIY superhero party! It was a great success with some showstopper moments.
This was my first real 'theme' birthday party and I had so much fun with the planning and organising. Everything was kept pretty low-budget and DIY - most of these kids were only 3 or just turned 4 so we kept the focus on making it as fun as possible without too much fuss.
- I made a superhero cityscape using old cardboard boxes and paper. I posted a tutorial here: DIY 3D City
- The cupcake stand was a plain cardboard cheapo that I hand-painted. More on that here: Superhero Cupcake Stand - DIY
- The Spiderman cake I made myself using some great tips from tutorials from around the web (pun intended). More on that here: Spiderman Cake!
- The name was also DIY. I just used cardboard letters and pasted on some cut out comic strip gift wrapping paper that I found. Super cheap and easy!
I resorted to the classic party game staples with a superhero twists:
- Pin the spider on the Spiderman - again another DIY where I just got a Spiderman poster and... well you get the drift.
- Pass the parcel - wrapped in that comic strip gift wrapping paper that I used for the letters and with a superhero themed goody in each layer.
- Make your own mask - we also had a table set up where kids could make their own masks.
The kids DID have fun with these games, BUT the most memorable thing about this party was a personal visit from Spiderman himself.
...yes, that is my husband in a Spiderman suit (purchased online for a very reasonable price). You may not have been fooled but the kids sure were and they were SO excited that the 'real' Spiderman had come to Harvey's party.
The celebrity visit was planned perfectly and came off without a hitch.
First we called out to the playing kids that Spiderman had called us on the 'spider phone' and needed all the 'creepy crawlies' cleared from the yard. This then segued into a scavenger hunt for little plastic bugs and critters that had been strewn around the yard in advance. They had to fill a central container with the bugs (teamwork) and when they did there would be a surprise at the end. The kids loved the scavenger hunt, but we keep finding those little plastic bugs, frogs and snakes throughout the garden which has caused a sharp intake of breath on more than one occasion.
Once the container was full, the Spiderman theme song started playing and in ran Spiderman (husband took the opportunity to get changed in secret while the scavenger hunt was on). He had cans of 'silly string' and sprayed 'spider web' all over the kids. They were overcome with squeals of delight.
Spiderman was on a timeframe, that suit was hot (not to mention a little tight) so we had an activity planned. The little superheros were going to have to cross an obstacle course, lead by Spiderman, so that they could return to head quarters and enjoy the birthday meal. We used slides and swings and crawl tunnels etc, just toys and play equipment that we already had.
Once the obstacle course was successfully crossed by all little superheros they sat down to eat a birthday lunch. Spiderman had a (very small) gift for them all before doing a magic trick (using his superhero powers of course) before he left.
The magic colored water trick was the easiest, most effective thing to do and it blew the kids minds. Spiderman announced he was going to fill their water jug with 'magic spider water', then took a jug of clear water and poured it into another jug at which point it turned blue - cue the gasps of amazement and pure awe from the kids. The trick is to put the smallest amount of food coloring in the bottom of the second jug. The kids don't see it as they are paying too much attention to Spiderman and from their perspective the water just turns blue by magic (you will need 2 clear jugs for full effect).
In the wake of the awe of 12 tiny superheroes, Spiderman then made his exit. The party was a huge success.
My kids still think the real Spiderman came to Harvey's 4th birthday and although I am sure they will work it out eventually they currently think it was the coolest thing in the world. Thanks Spiderman.
Tuesday, June 10, 2014
Superhero Cupcake Stand - DIY
Preparations for the 'Superhero' party for Mister 4 are in full swing and, let's face it, the creative juices are well and truly flowing.
Enter the superhero cupcake stand:

I purchased a super-cheap plain cardboard cupcake stand (the type you put together yourself), and just painted my superheros of choice. I used some paints that I had around the house to create the perfect stand to match the party theme (and colors).

I know that you can get some 'superhero' themed ones of these ready-made, but the only ones I could find were either super cheesy or super violent. I chose the three superheroes (my sons' two favorites and one to match the color theme) and went to work.
I even included an 'H' instead of the 'S' for 'Super Harvey!'

It was a bit more work than I expected (it took a few coats to get the colors bright enough) but I think it looks pretty cool. I was a bit reluctant to cover it up with my version of 'cupcakes' (chocolate crackles).

More of the Superhero Party posts, tips and tutorials HERE
Enter the superhero cupcake stand:
I purchased a super-cheap plain cardboard cupcake stand (the type you put together yourself), and just painted my superheros of choice. I used some paints that I had around the house to create the perfect stand to match the party theme (and colors).
I know that you can get some 'superhero' themed ones of these ready-made, but the only ones I could find were either super cheesy or super violent. I chose the three superheroes (my sons' two favorites and one to match the color theme) and went to work.
I even included an 'H' instead of the 'S' for 'Super Harvey!'
More of the Superhero Party posts, tips and tutorials HERE
Tuesday, November 13, 2012
Superhero Party - DIY 3D City
I can't believe that it is that time of year again! No, I don't mean the holidays, although they are also creeping up, I mean time for organising and planning the kids' birthdays.
This year my eldest son turns 4 and he is determined to have a superhero party. You may or may not be a fan of stereotypical 'themed' parties for kids, but once your nearly 4 year old gets his mind set on something, it is very difficult to shift.
I am still in early planning stages for the party but I thought I would share with you this fabulous DIY project I have begun for the decorations.


This year my eldest son turns 4 and he is determined to have a superhero party. You may or may not be a fan of stereotypical 'themed' parties for kids, but once your nearly 4 year old gets his mind set on something, it is very difficult to shift.
I am still in early planning stages for the party but I thought I would share with you this fabulous DIY project I have begun for the decorations.

This 3D superhero city-scape looks so effective and was the easiest thing to make, seriously anyone could do it.

Superhero party decoration DIY tips:
- Save boxes of various sizes over a period of time, the more variation in sizes the better. If you are using the decoration on a table setting then keep your boxes smallish so as not to take up too much space.
- Color the boxes black or grey. Your options on how to do this are endless, I simply 'wrapped' them in black crepe paper, keeping all the daggy bits at the back and bottom where I know they will be out of sight. You could of course paint them for a bit more durability, but I thought wrapping was a lot quicker.
- Add windows. I simply cut rough squares and rectangles out of white copy paper (yellow could work too) and glued them on. Don't try and be too perfect, mishapen windows give it more of a 'comic book' feel. Again, I guess you could paint them if you felt so inclined.
- Have fun arranging!
If you can get hold of some superhero figurines you could scatter them throughout your 'city' or you could cut out pictures of your favourites and prop them up for effect:

My original intention was to use it as decoration on the desert table with various superheros scattered about, but it is currently in the playroom and the kids love playing with it!

Now the only problem is to keep it in one piece to last until the party..... oh well I guess I could always make more!
Thursday, July 28, 2011
Great Balls of Fire!
Sorry, we're moving the blog and it seems this one didn't work properly. You can find this post at http://www.wallfry.com/blog/great-balls-of-fire.html
Friday, July 15, 2011
Ikea Hack - Old Frame made good.
We've updated our blog - you should be able to find this post here.
Friday, July 1, 2011
Monday, June 20, 2011
DIY Personalized Wall Letters
One of the biggest selling items in my nursery art store WallFry are the custom, personalized Wall Letters. They are different from a lot of the other wall letters for children, in that you only need one! They are perfect for hanging on the door to a child's room (this is where I have the letters for each of my boys) as a name sign, above a bed or even sitting on a shelf.
How does it work? I make the first letter of your child's name with their name on the letter:
![]()
This is such a popular and unique concept and yet simple and straight-forward to make. It is a little bit fiddly and if you are like me, your hands will get a bit dirty, but they can be fun to make. So here is a step-by-step tutorial with pictures on how to make your own personalized letter:
![]()
What you will need:
The first step is to paint your letter in the color of your choice.
TIP - I find it works best if you pick a color from your patterned paper so that it is coordinated. If there are any bumps on the papier mache use a fine grade sand-paper to gently sand them back first:
![]()
Paint both sides and once it is dry you can attach your paper to the sides. I use Mod Podge for this (although I am sure you could use any crafting glue).
TIP - apply the Mod Podge to the side of the letter then attach the paper, don't be tempted to put the glue on the paper first (otherwise it will curl up and be harder to manage):
![]()
Once you have attached the paper to all the sides, allow it to dry. Once it is dry I then seal the whole thing (over the paper sides and painted faces) with Mod Podge. This protects it, stops the paper peeling away over time and gives it a nice finish. Mod Podge goes on milky, but dries clear so don't be concerned by this (I was a little bit the first time!). Just make sure it is smooth and consistent, then allow it to dry:
![]()
Once the Mod Podge is dry, you are ready to attach your letters for the name. Peel off the backing first (if there is one) and glue it on.
TIP - even though the letters I use are stickers, I secure them on firmly using a PVA glue.
![]()
TIP - These types of foam letters come in a range of colors, but if yours don't match the color scheme that you have chosen, you can paint them in advance using acrylic paint. This can be a little fiddly so if you can get away with the letters as-is then I encourage you to do so. I do paint the foam letters most of the time, to get the best color match.
I then paint the foam letters with Mod Podge for extra protection but this is not necessary unless you want to.
Here are some examples of the finished product, your options are endless:
![]()
Or you can add embellishments, as well as or instead of the name:
![]()
![]()
How does it work? I make the first letter of your child's name with their name on the letter:
This is such a popular and unique concept and yet simple and straight-forward to make. It is a little bit fiddly and if you are like me, your hands will get a bit dirty, but they can be fun to make. So here is a step-by-step tutorial with pictures on how to make your own personalized letter:

What you will need:
- Papier Mache letter - in Australia, I buy mine from Spotlight, but similar letters can be purchased from any number of craft stores including the Hobby Lobby or Joann.
- Colorful paper - there are some beautiful gift wrapping papers out there which work really well. I also use vectors which I can match to my customer's decor and print off myself.
- Mod Podge - this like a decoupage/glue sealant that I use as an adhesive and sealant for protection. If you know a similar product then you are welcome to try it. I use the matte.
- Acrylic Paint - in the colors of your choice.
- Craft Letter Stickers - I use foam alphabet stickers that are actually intended for children's crafts. You can get something similar at any craft store.
- Standard crafting supplies - scissors, pencil, ruler, paint brushes, fine sand-paper etc
The first step is to paint your letter in the color of your choice.
TIP - I find it works best if you pick a color from your patterned paper so that it is coordinated. If there are any bumps on the papier mache use a fine grade sand-paper to gently sand them back first:

Paint both sides and once it is dry you can attach your paper to the sides. I use Mod Podge for this (although I am sure you could use any crafting glue).
TIP - apply the Mod Podge to the side of the letter then attach the paper, don't be tempted to put the glue on the paper first (otherwise it will curl up and be harder to manage):

Once you have attached the paper to all the sides, allow it to dry. Once it is dry I then seal the whole thing (over the paper sides and painted faces) with Mod Podge. This protects it, stops the paper peeling away over time and gives it a nice finish. Mod Podge goes on milky, but dries clear so don't be concerned by this (I was a little bit the first time!). Just make sure it is smooth and consistent, then allow it to dry:

Once the Mod Podge is dry, you are ready to attach your letters for the name. Peel off the backing first (if there is one) and glue it on.
TIP - even though the letters I use are stickers, I secure them on firmly using a PVA glue.

TIP - These types of foam letters come in a range of colors, but if yours don't match the color scheme that you have chosen, you can paint them in advance using acrylic paint. This can be a little fiddly so if you can get away with the letters as-is then I encourage you to do so. I do paint the foam letters most of the time, to get the best color match.
I then paint the foam letters with Mod Podge for extra protection but this is not necessary unless you want to.
Here are some examples of the finished product, your options are endless:
Or you can add embellishments, as well as or instead of the name:

I sell them with a small 'A' hook at the back but don't find it necessary for the ones that I have used in my own home. As they are very light, I adhere them to the wall with Blu Tak (removable adhesive putty).
These are a fantastic gift idea for:
- Baby Showers
- Newborns
- Kids Birthdays
- Naming Days
- Christmas etc
I have even used them for ABC letters in the kid's playroom:
Have Fun!
Thursday, June 9, 2011
Thursday, June 2, 2011
Upholstered Drawers
We have recently updated our blog - if our magical auto-redirect has not worked, please click on the link below to be taken directly to this post:
http://www.wallfry.com/blog/upholstered-drawers.html
http://www.wallfry.com/blog/upholstered-drawers.html
Tuesday, February 15, 2011
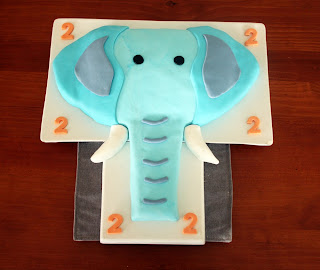
2nd Birthday Elephant Cake
The only thing is with making your own cakes for your childrens' birthdays is that there is a certain pressure for the cake to be better and better with each year and each party. So the pressure was on to go one better with Harvey's second birthday cake after the success of his first birthday cake.
I wanted to go with a theme cake that would appeal to him as well as be realitively easy to make. He loves his elephant toys and my elephant paintings and repeatedly demands renditions of 'Heidi Ho' so Elephant it was!
Here is the end result:

A quick summary of the steps involved in making the Elephant cake (I won't go as far as to call it a tutorial) are:
1. Bake cake - I have found a very basic butter cake to be economical and easy to cut to size once cooked.
2. While cake is cooling prepare your fondant icing. I highly recommend White Orchards white icing. It is ready made, easy to use and tastes great (as a lot of ready made fondant icings often don't). If you make your own and have a good recipe I would love if you could share it with us:

3. Icing needs to be kneaded with sifted icing sugar
4. Add food coloring of choice. If you want bright colors you need to either order colored fondant, or get the quality coloring (use too much of the supermarket stuff and your icing goes sticky) so pastels it is!
5. Once the fondant is prepared, keep it in an airtight container while you prepare your cake (not in the fridge)
6. If you are joining cakes together it is best to cut the tops off and cut them to size for a good match up. Use a quality bread knife for cutting and don't go too fast so you don't get too much crumbling.
**I drew my design in advance and placed it over the cake, then cut around it. I still have the template somewhere and will share it here once I find it.
7. Using butter icing (frosting) spread over your cake to fill in any gaps, joins or crumbly bits, let this set. (I have previously used a jelly spread or sugar paste under the fondant so that it sticks, but didn't this time and it was ok.

I wanted to go with a theme cake that would appeal to him as well as be realitively easy to make. He loves his elephant toys and my elephant paintings and repeatedly demands renditions of 'Heidi Ho' so Elephant it was!
Here is the end result:

A quick summary of the steps involved in making the Elephant cake (I won't go as far as to call it a tutorial) are:
1. Bake cake - I have found a very basic butter cake to be economical and easy to cut to size once cooked.
2. While cake is cooling prepare your fondant icing. I highly recommend White Orchards white icing. It is ready made, easy to use and tastes great (as a lot of ready made fondant icings often don't). If you make your own and have a good recipe I would love if you could share it with us:

3. Icing needs to be kneaded with sifted icing sugar
4. Add food coloring of choice. If you want bright colors you need to either order colored fondant, or get the quality coloring (use too much of the supermarket stuff and your icing goes sticky) so pastels it is!
5. Once the fondant is prepared, keep it in an airtight container while you prepare your cake (not in the fridge)
6. If you are joining cakes together it is best to cut the tops off and cut them to size for a good match up. Use a quality bread knife for cutting and don't go too fast so you don't get too much crumbling.
**I drew my design in advance and placed it over the cake, then cut around it. I still have the template somewhere and will share it here once I find it.

8.Roll your fondant out with a roller (using the sifted confection sugar) on Baking Paper (or greaseproof paper). Once it is even and to thickness you can pick up the paper and turn it over onto the cake. Once positioned on the cake you peel the paper off and you have a smooth, shiny surface with no white spots or dry bits. This is the best tip I have!
9. Cut or roll your other fondant embellishments to size and place over (use a bit of butter icing to secure them in place)

10. Take a photo of your cake now! Don't wait until the party or you will forget or run out of time or something equally frustrating. It is important to have a record of your hardwork and creativity!
And the main thing:
Harvey absolutely loved it 'Phant, Phant!' he shouted delightedly when he saw it (his word for 'elephant' of course) then waved his arm in the air and gave a two year old trumpet 'Bruauauurrrr'. He even blew his candle out all by himself.
It made it all worth it.
Friday, January 28, 2011
The story of Cup Muffins
Or how I substituted cupcakes for savoury muffins at a recent 2nd birthday party and got away with it!
In the interest of staving off tooth rot... and too much hyperactivity I decided to try to limit the sugar intake at Harvey's recent second birthday party. Yes there was cake (and an awesome cake at that which I will share with you in a later post), and there was fairy bread (for those who are not enlightened, fairy bread is bread, butter and sprinkles/hundreds and thousands - staple party food for Australian children), and there were 'cup muffins'!

The recipe I used was my own version of a savoury muffin recipe that I got of taste.com.au but you can really use whatever recipe you know that your kids will eat (this wasn't the important bit). The trick was to make them small (almost bite sized for us, but enough to pull up a two year old), put them in colourful patty pans (cupcake paper) and decorate them to look interesting.
To avoid collapse and make things a lot easier, I put the colourful patty pans in a muffin tray then put the mixture in:

I then used writing icing to put number '2s' on each in colours matching the patty pan, but you could of course do any decoration on top to match your party theme. The little bit of sugar (the icing) on top was enough to make them exciting for the kids who munched them down like there was no tomorrow. I know the sweet/savoury thing sounds a bit weird, but they tasted good.
Then you can arrange them in any appealing fashion you choose (I am sure you can be a little more imaginative than my effort:

I froze the excess and my 2 year old still munches on them when we are out and about. Have fun with the idea and be as creative (or not) as you like.
In the interest of staving off tooth rot... and too much hyperactivity I decided to try to limit the sugar intake at Harvey's recent second birthday party. Yes there was cake (and an awesome cake at that which I will share with you in a later post), and there was fairy bread (for those who are not enlightened, fairy bread is bread, butter and sprinkles/hundreds and thousands - staple party food for Australian children), and there were 'cup muffins'!

The recipe I used was my own version of a savoury muffin recipe that I got of taste.com.au but you can really use whatever recipe you know that your kids will eat (this wasn't the important bit). The trick was to make them small (almost bite sized for us, but enough to pull up a two year old), put them in colourful patty pans (cupcake paper) and decorate them to look interesting.
To avoid collapse and make things a lot easier, I put the colourful patty pans in a muffin tray then put the mixture in:

I then used writing icing to put number '2s' on each in colours matching the patty pan, but you could of course do any decoration on top to match your party theme. The little bit of sugar (the icing) on top was enough to make them exciting for the kids who munched them down like there was no tomorrow. I know the sweet/savoury thing sounds a bit weird, but they tasted good.
Then you can arrange them in any appealing fashion you choose (I am sure you can be a little more imaginative than my effort:

I froze the excess and my 2 year old still munches on them when we are out and about. Have fun with the idea and be as creative (or not) as you like.
Wednesday, December 29, 2010
Making Number 2s
There are so many different children's birthday themes and ideas for decorations that it can become an expensive exercise for something that usually all gets thrown out the next day (or the same day if you are really efficient). So I took DIY to the next level and had Harvey create some of his own decorations for his second birthday party.
So here is my tutorial on how to get a 2 year old to make number twos:
All you need to get started are some number 2s (I purchased these ready made from a party store very cheaply, or of course you could cut out some yourself), paint, brushes etc:

I set him up outside on his play table with some butcher paper taped to the table (although he did not end up getting any on the ground, so we could have done it inside). Then you let the little master do his work:

I had purchased an Art smock for him to wear but couldn't find it at the time, so I let him go topless. If you use acrylic, or even better poster paints, it washes off easily with soap and water. His little belly became a canvas all of its own:
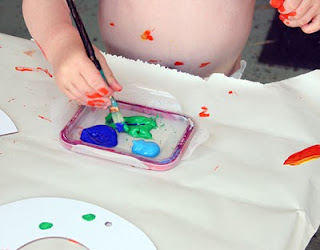
To prevent everything going a lovely shade of brown from all the unrestrained mixing I followed a fantastic tip that I got from a fabulous blog called Lil Blue Boo.
The secret is to not cross the colour wheel. I made sure to keep the colours simple and to not let him have any colours at the same time that would make brown. Once he was finished with the reds & yellows, I turned the numbers over and he painted the other sides in blues and greens. That way he could mix to his hearts content and only ever made ever changing shades of orange and green:


I then simply put ribbon through the holes and hung them along with primary coloured balloons. They looked fabulous and got lots of comments. Harvey was so proud of his number 2s 'two, two!' and he had a great time making them!

So here is my tutorial on how to get a 2 year old to make number twos:
All you need to get started are some number 2s (I purchased these ready made from a party store very cheaply, or of course you could cut out some yourself), paint, brushes etc:

I set him up outside on his play table with some butcher paper taped to the table (although he did not end up getting any on the ground, so we could have done it inside). Then you let the little master do his work:

I had purchased an Art smock for him to wear but couldn't find it at the time, so I let him go topless. If you use acrylic, or even better poster paints, it washes off easily with soap and water. His little belly became a canvas all of its own:

To prevent everything going a lovely shade of brown from all the unrestrained mixing I followed a fantastic tip that I got from a fabulous blog called Lil Blue Boo.
The secret is to not cross the colour wheel. I made sure to keep the colours simple and to not let him have any colours at the same time that would make brown. Once he was finished with the reds & yellows, I turned the numbers over and he painted the other sides in blues and greens. That way he could mix to his hearts content and only ever made ever changing shades of orange and green:


I then simply put ribbon through the holes and hung them along with primary coloured balloons. They looked fabulous and got lots of comments. Harvey was so proud of his number 2s 'two, two!' and he had a great time making them!

Saturday, November 13, 2010
Cake fit for a One year old
Harvey turned 1 a while ago now, but as more birthdays approach and I start to think about decorating cakes again, I had to share his First Birthday Cake that I made.

I found a picture of a similar cake on google images for inspiration (I can't remember where, if it was your cake let me know and I will give you credit) and changed colors and added the name. The balls where the edge meets the plate hide a multitude of sins and I think are one of the easiest most effective ways to do this.
The cake is iced with pre-made fondant (White orchards, white icing) which I purchased at the local supermarket. I did my research and found a few tutorials on YouTube, but all in all it is just using your common sense.
My top 5 tips when cutting a cake to shape are:

One final tip. You might not want your one year old to destroy your hard work with their curious little hands. I made a special little cake just for Harvey to blow out the candle and have his first piece of cake. He loved it:
Now I have to start thinking of designs for Felix and Harvey's next birthday, I am looking forward to it.

I found a picture of a similar cake on google images for inspiration (I can't remember where, if it was your cake let me know and I will give you credit) and changed colors and added the name. The balls where the edge meets the plate hide a multitude of sins and I think are one of the easiest most effective ways to do this.
The cake is iced with pre-made fondant (White orchards, white icing) which I purchased at the local supermarket. I did my research and found a few tutorials on YouTube, but all in all it is just using your common sense.
My top 5 tips when cutting a cake to shape are:
- Use a heavy cake (either mud cake or moist cake) to cut to shape, anything lighter will crumble.
- Make a template out of paper first and, place it over the cake and cut around it.
- Cut the top off the cake so that it sits flat.
- Sit it on the plate upside down so there are less crumbs for icing.
- If you don't have big enough baking tins, don't worry, you can join two together with butter icing.
- Add food color to the white to create color. Don't expect colors to be too bright or dark as the amount of food color you would need will make the icing too wet (I believe that you can buy pre-colored icing at cake supply stores)
- Ice with a thin layer of butter icing first to smooth any bumps or divets
- Once the butter icing has set, spread with a jam (or jelly) before applying the fondant to the cake (this helps it stick in place
- Use cookie cutters to make shapes (you can cut shapes free hand but this is easier)
- Don't store the cake in the fridge once iced as the fondant goes sticky.

One final tip. You might not want your one year old to destroy your hard work with their curious little hands. I made a special little cake just for Harvey to blow out the candle and have his first piece of cake. He loved it:
 |  |
Subscribe to:
Posts (Atom)
