
Showing posts with label Tutorials. Show all posts
Showing posts with label Tutorials. Show all posts
Sunday, February 15, 2015
DIY Wooden Name Blocks


Wednesday, February 4, 2015
Making an octopus dip
We've moved our blog around! You can now find this post here. (Sorry about that)
Tuesday, October 21, 2014
Make your Own Creepy Eyes!
We're changing our blog around a bit - you can still find this story here: http://www.wallfry.com/blog/make-your-own-creepy-eyes.html
Tuesday, July 29, 2014
Hand Print Bouquet - DIY Tutorial
My mother had surgery recently and my kids wanted to send their Nana some flowers while she was in hospital. Now while flowers are a lovely thing to receive, they can be quite expensive and let's face it, they die! My mother is also highly allergic so it was an all round bad idea.
So I took some inspiration from a Mother's Day gift one of my boys had made for me at kinder this year and together the kids and I made her this gorgeous hand-print bouquet:

It was so easy to do and the kids could get involved as well, which they just loved. Here are some tips that I learned through the process:


Once you have all yourflowers hand/foot prints you can then arrange them.
Work out your bouquet / paper sizes first so you know what you are working with. This can be done on a large scale (ours was pretty big on an A2+ piece of card) or much smaller (the one I received from kinder was on an A3 size).
Then get to arranging to get the look you are going for:


As you can see the hand prints don't need to be perfect or uniform either.

So I took some inspiration from a Mother's Day gift one of my boys had made for me at kinder this year and together the kids and I made her this gorgeous hand-print bouquet:
It was so easy to do and the kids could get involved as well, which they just loved. Here are some tips that I learned through the process:
- Hand prints work best when you paint the hand and they then stamp the paper with it. Dipping in a tray of paint might sound like a good idea... it wasn't.
- While you can use whatever color scheme you like, I found it easier to keep it to one color per child (they chose their colors). That way I (and Nana later on) could identify which hand print belonged to which child.
- I now know that it is near impossible to get a hand print from an 8 month old. Foot prints, while still difficult to get without help (shout out to my very helpful 5 year old) were much easier and looked great mixed in with the hand prints for a bit of added interest.
- I added the 'leaves' for a bit of color and authenticity. The boys and I just cut these from colored paper.
- When the kids go to wash the paint off their hands, make sure that they don't make a stop at the toilet on the way because they 'forgot' (we won't mention any names). You will find paint in places you didn't know it was possible for paint to go.
- The hand / foot prints don't need to be cut out perfectly. The rough border makes them quicker and easier to cut, it keeps them sturdy and it means that the kids can get involved and help with the cutting too. I also like the effect.
Once you have all your
Work out your bouquet / paper sizes first so you know what you are working with. This can be done on a large scale (ours was pretty big on an A2+ piece of card) or much smaller (the one I received from kinder was on an A3 size).
Then get to arranging to get the look you are going for:
- I just used Clag (paste for paper and card) to stick them on but any craft type glue would work, it doesn't need a super-hold.
- It might be hard to visualise what the flat arrangement will look like when pulled into a cone shape. I kept picking mine up and curling it to get a better idea.
- I also liked letting the hand prints stick up over the card base to give more of that 'flower' effect.
- Once you are done and your glue is dry you just pull your base card paper around at the bottom into a cone/bouquet shape and stick (or staple for a stronger hold).
- I then also used a contrasting colored paper wrapped around the bottom of the bouquet, florist style' to hide my joins, which I thought was a nice effect.
My mother absolutely loved this gift and I did too when I received my smaller version. It is thoughtful, hand-made, representative of the kids / grandkids and is something to treasure for longer than the usual week that actual flowers last.
This is a super-easy DIY that the kids can get involved with, which makes it all the more special for the receiver. It would be a perfect gift for Mother's Day, a get well gift, or any gift for a mother or grandmother who cherishes their children.
Thursday, June 2, 2011
Upholstered Drawers
We have recently updated our blog - if our magical auto-redirect has not worked, please click on the link below to be taken directly to this post:
http://www.wallfry.com/blog/upholstered-drawers.html
http://www.wallfry.com/blog/upholstered-drawers.html
Friday, January 28, 2011
The story of Cup Muffins
Or how I substituted cupcakes for savoury muffins at a recent 2nd birthday party and got away with it!
In the interest of staving off tooth rot... and too much hyperactivity I decided to try to limit the sugar intake at Harvey's recent second birthday party. Yes there was cake (and an awesome cake at that which I will share with you in a later post), and there was fairy bread (for those who are not enlightened, fairy bread is bread, butter and sprinkles/hundreds and thousands - staple party food for Australian children), and there were 'cup muffins'!

The recipe I used was my own version of a savoury muffin recipe that I got of taste.com.au but you can really use whatever recipe you know that your kids will eat (this wasn't the important bit). The trick was to make them small (almost bite sized for us, but enough to pull up a two year old), put them in colourful patty pans (cupcake paper) and decorate them to look interesting.
To avoid collapse and make things a lot easier, I put the colourful patty pans in a muffin tray then put the mixture in:

I then used writing icing to put number '2s' on each in colours matching the patty pan, but you could of course do any decoration on top to match your party theme. The little bit of sugar (the icing) on top was enough to make them exciting for the kids who munched them down like there was no tomorrow. I know the sweet/savoury thing sounds a bit weird, but they tasted good.
Then you can arrange them in any appealing fashion you choose (I am sure you can be a little more imaginative than my effort:

I froze the excess and my 2 year old still munches on them when we are out and about. Have fun with the idea and be as creative (or not) as you like.
In the interest of staving off tooth rot... and too much hyperactivity I decided to try to limit the sugar intake at Harvey's recent second birthday party. Yes there was cake (and an awesome cake at that which I will share with you in a later post), and there was fairy bread (for those who are not enlightened, fairy bread is bread, butter and sprinkles/hundreds and thousands - staple party food for Australian children), and there were 'cup muffins'!

The recipe I used was my own version of a savoury muffin recipe that I got of taste.com.au but you can really use whatever recipe you know that your kids will eat (this wasn't the important bit). The trick was to make them small (almost bite sized for us, but enough to pull up a two year old), put them in colourful patty pans (cupcake paper) and decorate them to look interesting.
To avoid collapse and make things a lot easier, I put the colourful patty pans in a muffin tray then put the mixture in:

I then used writing icing to put number '2s' on each in colours matching the patty pan, but you could of course do any decoration on top to match your party theme. The little bit of sugar (the icing) on top was enough to make them exciting for the kids who munched them down like there was no tomorrow. I know the sweet/savoury thing sounds a bit weird, but they tasted good.
Then you can arrange them in any appealing fashion you choose (I am sure you can be a little more imaginative than my effort:

I froze the excess and my 2 year old still munches on them when we are out and about. Have fun with the idea and be as creative (or not) as you like.
Wednesday, December 29, 2010
Making Number 2s
There are so many different children's birthday themes and ideas for decorations that it can become an expensive exercise for something that usually all gets thrown out the next day (or the same day if you are really efficient). So I took DIY to the next level and had Harvey create some of his own decorations for his second birthday party.
So here is my tutorial on how to get a 2 year old to make number twos:
All you need to get started are some number 2s (I purchased these ready made from a party store very cheaply, or of course you could cut out some yourself), paint, brushes etc:

I set him up outside on his play table with some butcher paper taped to the table (although he did not end up getting any on the ground, so we could have done it inside). Then you let the little master do his work:

I had purchased an Art smock for him to wear but couldn't find it at the time, so I let him go topless. If you use acrylic, or even better poster paints, it washes off easily with soap and water. His little belly became a canvas all of its own:
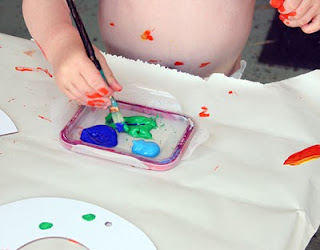
To prevent everything going a lovely shade of brown from all the unrestrained mixing I followed a fantastic tip that I got from a fabulous blog called Lil Blue Boo.
The secret is to not cross the colour wheel. I made sure to keep the colours simple and to not let him have any colours at the same time that would make brown. Once he was finished with the reds & yellows, I turned the numbers over and he painted the other sides in blues and greens. That way he could mix to his hearts content and only ever made ever changing shades of orange and green:


I then simply put ribbon through the holes and hung them along with primary coloured balloons. They looked fabulous and got lots of comments. Harvey was so proud of his number 2s 'two, two!' and he had a great time making them!

So here is my tutorial on how to get a 2 year old to make number twos:
All you need to get started are some number 2s (I purchased these ready made from a party store very cheaply, or of course you could cut out some yourself), paint, brushes etc:

I set him up outside on his play table with some butcher paper taped to the table (although he did not end up getting any on the ground, so we could have done it inside). Then you let the little master do his work:

I had purchased an Art smock for him to wear but couldn't find it at the time, so I let him go topless. If you use acrylic, or even better poster paints, it washes off easily with soap and water. His little belly became a canvas all of its own:

To prevent everything going a lovely shade of brown from all the unrestrained mixing I followed a fantastic tip that I got from a fabulous blog called Lil Blue Boo.
The secret is to not cross the colour wheel. I made sure to keep the colours simple and to not let him have any colours at the same time that would make brown. Once he was finished with the reds & yellows, I turned the numbers over and he painted the other sides in blues and greens. That way he could mix to his hearts content and only ever made ever changing shades of orange and green:


I then simply put ribbon through the holes and hung them along with primary coloured balloons. They looked fabulous and got lots of comments. Harvey was so proud of his number 2s 'two, two!' and he had a great time making them!

Saturday, November 13, 2010
Cake fit for a One year old
Harvey turned 1 a while ago now, but as more birthdays approach and I start to think about decorating cakes again, I had to share his First Birthday Cake that I made.

I found a picture of a similar cake on google images for inspiration (I can't remember where, if it was your cake let me know and I will give you credit) and changed colors and added the name. The balls where the edge meets the plate hide a multitude of sins and I think are one of the easiest most effective ways to do this.
The cake is iced with pre-made fondant (White orchards, white icing) which I purchased at the local supermarket. I did my research and found a few tutorials on YouTube, but all in all it is just using your common sense.
My top 5 tips when cutting a cake to shape are:

One final tip. You might not want your one year old to destroy your hard work with their curious little hands. I made a special little cake just for Harvey to blow out the candle and have his first piece of cake. He loved it:
Now I have to start thinking of designs for Felix and Harvey's next birthday, I am looking forward to it.

I found a picture of a similar cake on google images for inspiration (I can't remember where, if it was your cake let me know and I will give you credit) and changed colors and added the name. The balls where the edge meets the plate hide a multitude of sins and I think are one of the easiest most effective ways to do this.
The cake is iced with pre-made fondant (White orchards, white icing) which I purchased at the local supermarket. I did my research and found a few tutorials on YouTube, but all in all it is just using your common sense.
My top 5 tips when cutting a cake to shape are:
- Use a heavy cake (either mud cake or moist cake) to cut to shape, anything lighter will crumble.
- Make a template out of paper first and, place it over the cake and cut around it.
- Cut the top off the cake so that it sits flat.
- Sit it on the plate upside down so there are less crumbs for icing.
- If you don't have big enough baking tins, don't worry, you can join two together with butter icing.
- Add food color to the white to create color. Don't expect colors to be too bright or dark as the amount of food color you would need will make the icing too wet (I believe that you can buy pre-colored icing at cake supply stores)
- Ice with a thin layer of butter icing first to smooth any bumps or divets
- Once the butter icing has set, spread with a jam (or jelly) before applying the fondant to the cake (this helps it stick in place
- Use cookie cutters to make shapes (you can cut shapes free hand but this is easier)
- Don't store the cake in the fridge once iced as the fondant goes sticky.

One final tip. You might not want your one year old to destroy your hard work with their curious little hands. I made a special little cake just for Harvey to blow out the candle and have his first piece of cake. He loved it:
 |  |
Subscribe to:
Posts (Atom)
