Sorry, we're moving the blog and it seems this one didn't work properly. You can find this post at http://www.wallfry.com/blog/great-balls-of-fire.html

Thursday, July 28, 2011


Sunday, July 24, 2011
New Owl Prints - Buy One get One Free!
UPDATE - Sale ends Sunday 9 October 2011
I am so very excited to have made some of my more popular owl paintings on canvas from the Owl Series by WallFry available in 8x10 prints. To celebrate I am offering an introductory offer on all these new 8x10 prints - BUY ONE GET ONE FREE!
The range of 8x10 prints includes Owls for Boys, Owls for Girls and Owls for both. There is pink on pink and a set of retro colors. Here are some of the new prints available, you can see more in my WallFry store:
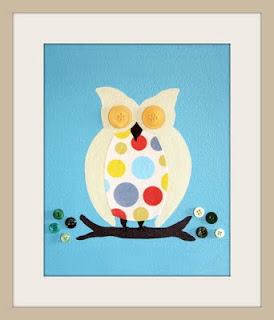


Heaps more owl prints and other nursery art in my shop.
UPDATE - New Owl designs have been added to this offer and it also now includes the Russian Dolls prints. Some are here:


I am so very excited to have made some of my more popular owl paintings on canvas from the Owl Series by WallFry available in 8x10 prints. To celebrate I am offering an introductory offer on all these new 8x10 prints - BUY ONE GET ONE FREE!
The range of 8x10 prints includes Owls for Boys, Owls for Girls and Owls for both. There is pink on pink and a set of retro colors. Here are some of the new prints available, you can see more in my WallFry store:
Heaps more owl prints and other nursery art in my shop.
UPDATE - New Owl designs have been added to this offer and it also now includes the Russian Dolls prints. Some are here:


Thursday, July 21, 2011
Butterfly Cake for Girls
Monday, July 18, 2011
Who Said Dogs Were for Boys?
Dogs for Girls?
The nursery rhyme might say that it is little boys who are made of 'snips and snails and puppy dog tails' but it doesn't stop little girls LOVING dogs too. WallFry has a lot of dogs for boys and gender neutral dogs, but here are some just for little girls:


Maybe that's what little girls are made of after all....
The nursery rhyme might say that it is little boys who are made of 'snips and snails and puppy dog tails' but it doesn't stop little girls LOVING dogs too. WallFry has a lot of dogs for boys and gender neutral dogs, but here are some just for little girls:
Maybe that's what little girls are made of after all....
Friday, July 15, 2011
Ikea Hack - Old Frame made good.
We've updated our blog - you should be able to find this post here.
Monday, July 4, 2011
New Print - Owls in a Tree
I just listed this new print from my original painting, Owls in a Tree! I love the blues and browns, they would be perfect for any owl loving boy or girl.

Friday, July 1, 2011
Sunday, June 26, 2011
Does your Art match your Nursery?
Oh no! This page has moved. And we're not technical enough to make it automaticall redirect, so you can find this post here.
Tuesday, June 21, 2011
50% off ALL PRINTS
WallFry is now on Facebook and Twitter and in celebration I would like to offer a massive 50% off all nursery art prints in the WallFry Shop!
I will have regular awesome giveaways and discounts like this one which I will post on my Blog, Twitter and Facebook for all my readers, followers and fans.
To receive the 50% off, simply enter the coupon code FOLLOW when purchasing your print or prints from the WallFry Shop.You can use the code as many times as you like before then and feel free to share it with your friends!
Offer ends Sunday 26th June 2011 AEST.
PLEASE NOTE - the 50% off applies to PRINTS only and does not apply to canvas paintings. If you are unsure at all, send me a message.
Some examples of the range of prints by WallFry:
Monday, June 20, 2011
DIY Personalized Wall Letters
One of the biggest selling items in my nursery art store WallFry are the custom, personalized Wall Letters. They are different from a lot of the other wall letters for children, in that you only need one! They are perfect for hanging on the door to a child's room (this is where I have the letters for each of my boys) as a name sign, above a bed or even sitting on a shelf.
How does it work? I make the first letter of your child's name with their name on the letter:
![]()
This is such a popular and unique concept and yet simple and straight-forward to make. It is a little bit fiddly and if you are like me, your hands will get a bit dirty, but they can be fun to make. So here is a step-by-step tutorial with pictures on how to make your own personalized letter:
![]()
What you will need:
The first step is to paint your letter in the color of your choice.
TIP - I find it works best if you pick a color from your patterned paper so that it is coordinated. If there are any bumps on the papier mache use a fine grade sand-paper to gently sand them back first:
![]()
Paint both sides and once it is dry you can attach your paper to the sides. I use Mod Podge for this (although I am sure you could use any crafting glue).
TIP - apply the Mod Podge to the side of the letter then attach the paper, don't be tempted to put the glue on the paper first (otherwise it will curl up and be harder to manage):
![]()
Once you have attached the paper to all the sides, allow it to dry. Once it is dry I then seal the whole thing (over the paper sides and painted faces) with Mod Podge. This protects it, stops the paper peeling away over time and gives it a nice finish. Mod Podge goes on milky, but dries clear so don't be concerned by this (I was a little bit the first time!). Just make sure it is smooth and consistent, then allow it to dry:
![]()
Once the Mod Podge is dry, you are ready to attach your letters for the name. Peel off the backing first (if there is one) and glue it on.
TIP - even though the letters I use are stickers, I secure them on firmly using a PVA glue.
![]()
TIP - These types of foam letters come in a range of colors, but if yours don't match the color scheme that you have chosen, you can paint them in advance using acrylic paint. This can be a little fiddly so if you can get away with the letters as-is then I encourage you to do so. I do paint the foam letters most of the time, to get the best color match.
I then paint the foam letters with Mod Podge for extra protection but this is not necessary unless you want to.
Here are some examples of the finished product, your options are endless:
![]()
Or you can add embellishments, as well as or instead of the name:
![]()
![]()
How does it work? I make the first letter of your child's name with their name on the letter:
This is such a popular and unique concept and yet simple and straight-forward to make. It is a little bit fiddly and if you are like me, your hands will get a bit dirty, but they can be fun to make. So here is a step-by-step tutorial with pictures on how to make your own personalized letter:

What you will need:
- Papier Mache letter - in Australia, I buy mine from Spotlight, but similar letters can be purchased from any number of craft stores including the Hobby Lobby or Joann.
- Colorful paper - there are some beautiful gift wrapping papers out there which work really well. I also use vectors which I can match to my customer's decor and print off myself.
- Mod Podge - this like a decoupage/glue sealant that I use as an adhesive and sealant for protection. If you know a similar product then you are welcome to try it. I use the matte.
- Acrylic Paint - in the colors of your choice.
- Craft Letter Stickers - I use foam alphabet stickers that are actually intended for children's crafts. You can get something similar at any craft store.
- Standard crafting supplies - scissors, pencil, ruler, paint brushes, fine sand-paper etc
The first step is to paint your letter in the color of your choice.
TIP - I find it works best if you pick a color from your patterned paper so that it is coordinated. If there are any bumps on the papier mache use a fine grade sand-paper to gently sand them back first:

Paint both sides and once it is dry you can attach your paper to the sides. I use Mod Podge for this (although I am sure you could use any crafting glue).
TIP - apply the Mod Podge to the side of the letter then attach the paper, don't be tempted to put the glue on the paper first (otherwise it will curl up and be harder to manage):

Once you have attached the paper to all the sides, allow it to dry. Once it is dry I then seal the whole thing (over the paper sides and painted faces) with Mod Podge. This protects it, stops the paper peeling away over time and gives it a nice finish. Mod Podge goes on milky, but dries clear so don't be concerned by this (I was a little bit the first time!). Just make sure it is smooth and consistent, then allow it to dry:

Once the Mod Podge is dry, you are ready to attach your letters for the name. Peel off the backing first (if there is one) and glue it on.
TIP - even though the letters I use are stickers, I secure them on firmly using a PVA glue.

TIP - These types of foam letters come in a range of colors, but if yours don't match the color scheme that you have chosen, you can paint them in advance using acrylic paint. This can be a little fiddly so if you can get away with the letters as-is then I encourage you to do so. I do paint the foam letters most of the time, to get the best color match.
I then paint the foam letters with Mod Podge for extra protection but this is not necessary unless you want to.
Here are some examples of the finished product, your options are endless:
Or you can add embellishments, as well as or instead of the name:

I sell them with a small 'A' hook at the back but don't find it necessary for the ones that I have used in my own home. As they are very light, I adhere them to the wall with Blu Tak (removable adhesive putty).
These are a fantastic gift idea for:
- Baby Showers
- Newborns
- Kids Birthdays
- Naming Days
- Christmas etc
I have even used them for ABC letters in the kid's playroom:
Have Fun!
Subscribe to:
Posts (Atom)
