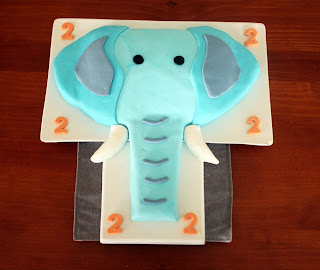
I wanted to go with a theme cake that would appeal to him as well as be realitively easy to make. He loves his elephant toys and my elephant paintings and repeatedly demands renditions of 'Heidi Ho' so Elephant it was!
Here is the end result:
A quick summary of the steps involved in making the Elephant cake (I won't go as far as to call it a tutorial) are:
1. Bake cake - I have found a very basic butter cake to be economical and easy to cut to size once cooked.
2. While cake is cooling prepare your fondant icing. I highly recommend White Orchards white icing. It is ready made, easy to use and tastes great (as a lot of ready made fondant icings often don't). If you make your own and have a good recipe I would love if you could share it with us:
3. Icing needs to be kneaded with sifted icing sugar
4. Add food coloring of choice. If you want bright colors you need to either order colored fondant, or get the quality coloring (use too much of the supermarket stuff and your icing goes sticky) so pastels it is!
5. Once the fondant is prepared, keep it in an airtight container while you prepare your cake (not in the fridge)
6. If you are joining cakes together it is best to cut the tops off and cut them to size for a good match up. Use a quality bread knife for cutting and don't go too fast so you don't get too much crumbling.
**I drew my design in advance and placed it over the cake, then cut around it. I still have the template somewhere and will share it here once I find it.
8.Roll your fondant out with a roller (using the sifted confection sugar) on Baking Paper (or greaseproof paper). Once it is even and to thickness you can pick up the paper and turn it over onto the cake. Once positioned on the cake you peel the paper off and you have a smooth, shiny surface with no white spots or dry bits. This is the best tip I have!
9. Cut or roll your other fondant embellishments to size and place over (use a bit of butter icing to secure them in place)
10. Take a photo of your cake now! Don't wait until the party or you will forget or run out of time or something equally frustrating. It is important to have a record of your hardwork and creativity!
And the main thing:
Harvey absolutely loved it 'Phant, Phant!' he shouted delightedly when he saw it (his word for 'elephant' of course) then waved his arm in the air and gave a two year old trumpet 'Bruauauurrrr'. He even blew his candle out all by himself.
It made it all worth it.


