Saturday, March 5, 2011

WallFry Prints

WallFry (my nursery art store on Etsy) is really taking off and due to popular demand, I am now selling my paintings on canvas as prints!

I love painting, and one of the best things about purchasing hand-painted nursery art made-to-order is that you can customize colors and designs. This is one of the 'points of difference' that has made WallFry so successful so far. So, I will still be selling my paintings on canvas and still taking custom orders made-to-order in addition to selling the prints.

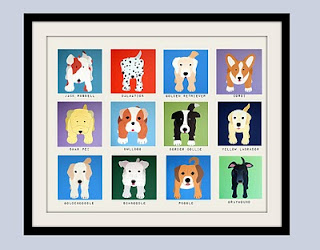
The first item I have listed is a combination of 12 of the dog paintings that I have done so far:


I was so excited to see my art as a print for the first time, the quality and detail is amazing! I am really hoping that this will make WallFry artwork more accessible to more people (and so much cheaper and easy to ship too).

So far I have printed the Safari Series, the Sea Creature Series and the 12 dogs in one (above). I am working on digitising my dinosaurs so that customers can customize colors to match their nursery color schemes.


Stay tuned

Tuesday, February 15, 2011

2nd Birthday Elephant Cake

The only thing is with making your own cakes for your childrens' birthdays is that there is a certain pressure for the cake to be better and better with each year and each party. So the pressure was on to go one better with Harvey's second birthday cake after the success of his first birthday cake.

I wanted to go with a theme cake that would appeal to him as well as be realitively easy to make. He loves his elephant toys and my elephant paintings and repeatedly demands renditions of 'Heidi Ho' so Elephant it was!

Here is the end result:


A quick summary of the steps involved in making the Elephant cake (I won't go as far as to call it a tutorial) are:

1. Bake cake - I have found a very basic butter cake to be economical and easy to cut to size once cooked.
2. While cake is cooling prepare your fondant icing. I highly recommend White Orchards white icing. It is ready made, easy to use and tastes great (as a lot of ready made fondant icings often don't). If you make your own and have a good recipe I would love if you could share it with us:


3. Icing needs to be kneaded with sifted icing sugar
4. Add food coloring of choice. If you want bright colors you need to either order colored fondant, or get the quality coloring (use too much of the supermarket stuff and your icing goes sticky) so pastels it is!
5. Once the fondant is prepared, keep it in an airtight container while you prepare your cake (not in the fridge)
6. If you are joining cakes together it is best to cut the tops off and cut them to size for a good match up. Use a quality bread knife for cutting and don't go too fast so you don't get too much crumbling.
**I drew my design in advance and placed it over the cake, then cut around it. I still have the template somewhere and will share it here once I find it.


7. Using butter icing (frosting) spread over your cake to fill in any gaps, joins or crumbly bits, let this set. (I have previously used a jelly spread or sugar paste under the fondant so that it sticks, but didn't this time and it was ok.
8.Roll your fondant out with a roller (using the sifted confection sugar) on Baking Paper (or greaseproof paper). Once it is even and to thickness you can pick up the paper and turn it over onto the cake. Once positioned on the cake you peel the paper off and you have a smooth, shiny surface with no white spots or dry bits. This is the best tip I have!
9. Cut or roll your other fondant embellishments to size and place over (use a bit of butter icing to secure them in place)


10. Take a photo of your cake now! Don't wait until the party or you will forget or run out of time or something equally frustrating. It is important to have a record of your hardwork and creativity!

And the main thing:

Harvey absolutely loved it 'Phant, Phant!' he shouted delightedly when he saw it (his word for 'elephant' of course) then waved his arm in the air and gave a two year old trumpet 'Bruauauurrrr'. He even blew his candle out all by himself.

It made it all worth it.

Wednesday, February 2, 2011

Playroom decor - as easy as ABC!

So, the playroom is looking really good and has been very very functional for a while now. It is a small success in the overall streamlining of storage, space and efficiency and just making the place look darn cool!

But lurking next to one of the windows was a thin vertical wall space just screaming out to be decorated! Ta Da! ABC ("... it's easy as...:") sorry, song stuck in my head:


I love these block letters made from papier mache. A few months ago I introduced them into my WallFry store as a new product line, but with personalized names on the face, like these here:


To make these, I paint a papier mache block letter, adhere patteren to the sides of the letter and then attach the name in a dense foam letter cut-out.

I had already made personalized letters for my boys, so wanted something more generic in the playroom. To make sure that the colors in the ABC letters coordinated with the rest of the playroom, I digitally picked the colors from the baskets in this photo:


then recreated those colors in  the designs on the sides and of the face of the three letters. I also found that they attach easily to the wall with blu-tak as they are very light. This makes it easy to move them around as the boys grow.

They look so bright, colorful and let's face it - awesome!

Friday, January 28, 2011

The story of Cup Muffins

Or how I substituted cupcakes for savoury muffins at a recent 2nd birthday party and got away with it!

In the interest of staving off tooth rot... and too much hyperactivity I decided to try to limit the sugar intake at Harvey's recent second birthday party. Yes there was cake (and an awesome cake at that which I will share with you in a later post), and there was fairy bread (for those who are not enlightened, fairy bread is bread, butter and sprinkles/hundreds and thousands - staple party food for Australian children), and there were 'cup muffins'!


The recipe I used was my own version of a savoury muffin recipe that I got of taste.com.au but you can really use whatever recipe you know that your kids will eat (this wasn't the important bit).  The trick was to make them small (almost bite sized for us, but enough to pull up a two year old), put them in colourful patty pans (cupcake paper) and decorate them to look interesting.

To avoid collapse and make things a lot easier, I put the colourful patty pans in a muffin tray then put the mixture in:


I then used writing icing to put number '2s' on each in colours matching the patty pan, but you could of course do any decoration on top to match your party theme. The little bit of sugar (the icing) on top was enough to make them exciting  for the kids who munched them down like there was no tomorrow. I know the sweet/savoury thing sounds a bit weird, but they tasted good.

Then you can arrange them in any appealing fashion you choose (I am sure you can be a little more imaginative than my effort:


I froze the excess and my 2 year old still munches on them when we are out and about. Have fun with the idea and be as creative (or not) as you like.

Friday, January 21, 2011

On Safari - new jungle animals in the safari series!

I am really excited about the two new additions to the Safari Series of paintings in my WallFry store. What started out as four is now six with the addition of a Rhinoceros:


and Cheetah:


 to the original Lion, Elephant, Hippopotomus and Zebra:


These paintings are so popular both individually and as a set of four. Since the addition of the extra two, I have sold a few sets of six as well. I love the bright, rich colors in these. I create texture in each canvas and really enjoy working with the colors and textures when painting them.

I designed the Rhino and Cheetah at the request of a customer and can't wait for more custom requests so that I can design more safari animals. I love the design process and this is when I am at my happiest creatively.

Enjoy!

Thursday, January 6, 2011

Pimp My Play Room

As the boys are getting older we are very quickly starting to run out of space in their play area / rumpus room. It is a space off to one side of the living area, not huge but it should be plenty big enough for two little guys. So it was time to organise and, better still, decorate! And to do so with a budget in mind.

It was important for it to be bright, fun, colourful and functional so that the kids could identify it as their own space. But with such close proximity to shared living areas it also had to be organised, neat, tidy and easy to keep that way.

The only major purchase was the shelving:


We purchased the shelves at Officeworks although they didn't sell this particular set online and we had to go instore. If there is not an Officeworks near you, they sell very similar shelves at Ikea reasonably priced. I loved the colourful baskets. They are ideal for storage, with things that the boys can access down low and those they can't, or shouldn't, up higher. They are easy for them to use too and Harvey, who is only 2 can get them out, play with their contents, pack up and put them away (although he never does). He much prefers to empty one and carry it around pretending it is a washing basket when he is helping me with the washing.

Although we have discovered there are other uses:


On one side is an old sofa bed that we have had for ages, so we don't need to worry about messes. It is also great to have for that unexpected extra guest to stay over. I have decorated it with some toys, cushions and a beautiful quilt using Michael Miller fabrics that my Mother made for Harvey when he was born:


On the other side, for extra storage, we put drawers that were previously bought from Ikea which I have covered with colourful fabrics. I plan to post a tutorial on how to cover drawers like this in fabric in the near future, so stay tuned:


Above the drawers I have hung a set of the Dog Series paintings from my nursery art store WallFry. I did originally paint them for the store, but fell in love with them so have left them hanging on the playroom wall:


I am going to make some of the papier mache letters that I also have in my store to coordinate with the colours in the baskets and will post pictures of the finished results soon.

So far the playroom is living up to its expectations. It is bright, fun, colourful and functional and I am finding that even with a 2 year old and an 11 month old, it is a lot easier to keep tidy and organised. The kids seem to love it too:


Wednesday, December 29, 2010

Making Number 2s

There are so many different children's birthday themes and ideas for decorations that it can become an expensive exercise for something that usually all gets thrown out the next day (or the same day if you are really efficient). So I took DIY to the next level and had Harvey create some of his own decorations for his second birthday party.

So here is my tutorial on how to get a 2 year old to make number twos:

All you need to get started are some number 2s (I purchased these ready made from a party store very cheaply, or of course you could cut out some yourself), paint, brushes etc:


I set him up outside on his play table with some butcher paper taped to the table (although he did not end up getting any on the ground, so we could have done it inside). Then you let the little master do his work:


I had purchased an Art smock for him to wear but couldn't find it at the time, so I let him go topless. If you use acrylic, or even better poster paints, it washes off easily with soap and water. His little belly became a canvas all of its own:


To prevent everything going a lovely shade of brown from all the unrestrained mixing I followed a fantastic tip that I got from a fabulous blog called Lil Blue Boo.
The secret is to not cross the colour wheel. I made sure to keep the colours simple and to not let him have any colours at the same time that would make brown. Once he was finished with the reds & yellows, I turned the numbers over and he painted the other sides in blues and greens. That way he could mix to his hearts content and only ever made ever changing shades of orange and green:


I then simply put ribbon through the holes and hung them along with primary coloured balloons. They looked fabulous and got lots of comments. Harvey was so proud of his number 2s 'two, two!' and  he had a great time making them!


Friday, November 26, 2010

Oh Dee - Wow!

I was so chuffed when I discovered that WallFry had been featured on 'Ohdeedoh', the childrens arm of the highly successful Apartment Therapy website. It looked something like this:

Colorful Custom Wall Letters


If you haven't heard of it already you should check http://www.ohdeedoh.com/ out. It is a great resource for nursery inspiration and ideas, children's birthday theme ideas, product information for kids and general discussion for people passionate about nurseries and kids rooms. It's a great place to go when you are designing a nursery or a child's space to get you started (and finished I would imagine).  It really has some very cool and original ideas, which is why I am honored to be mentioned.

Saturday, November 13, 2010

Cake fit for a One year old

Harvey turned 1 a while ago now, but as more birthdays approach and  I start to think about decorating cakes again, I had to share his First Birthday Cake that I made.


I found a picture of a similar cake on google images for inspiration (I can't remember where, if it was your cake let me know and I will give you credit) and changed colors and added the name. The balls where the edge meets the plate hide a multitude of sins and I think are one of the easiest most effective ways to do this.

The cake is iced with pre-made fondant (White orchards, white icing) which I purchased at the local supermarket. I did my research and found a few tutorials on YouTube, but all in all it is just using your common sense.

My top 5 tips when cutting a cake to shape are:
  • Use a heavy cake (either mud cake or moist cake) to cut to shape, anything lighter will crumble.
  • Make a template out of paper first and, place it over the cake and cut around it.
  • Cut the top off the cake so that it sits flat.
  • Sit it on the plate upside down so there are less crumbs for icing.
  • If you don't have big enough baking tins, don't worry, you can join two together with butter icing.
Top 5 tips for using with fondant icing:
  • Add food color to the white to create color. Don't expect colors to be too bright or dark as the amount of food color you would need will make the icing too wet (I believe that you can buy pre-colored icing at cake supply stores)
  • Ice with a thin layer of butter icing first to smooth any bumps or divets
  • Once the butter icing has set, spread with a jam (or jelly) before applying the fondant to the cake (this helps it stick in place
  • Use cookie cutters to make shapes (you can cut shapes free hand but this is easier)
  • Don't store the cake in the fridge once iced as the fondant goes sticky.
My love of cake decorating is a hidden passion and another great creative outlet.


One final tip. You might not want your one year old to destroy your hard work with their curious little hands. I made a special little cake just for Harvey to blow out the candle and have his first piece of cake. He loved it:

Now I have to start thinking of designs for Felix and Harvey's next birthday, I am looking forward to it.

Sunday, November 7, 2010

Under the Sea

I recently had a lovely customer commission custom paintings for her baby's nursery. She wanted a 'Sea Creature' theme but was unable to find exactly what she was looking for. After much searching she came accross my 'Safari Series' in my Etsy store and fell in love the with colors BUT there is no ocean in Africa!

Safari Series at WallFry
So the challenge was set - to design and paint a Sea Animals series in the same style as the Safari Series. I had been thinking of creating a Sea Life series but had not had the time, so I really enjoyed designing these paintings.

We had a crab & lobster


and a whale and octopus


I was really happy with the final result, as was my customer. Her baby now has these bright and fun ocean animals paintings hanging in their nursery. I can now paint these to order and customers can choose size and color which is really popular when coordinating with a nursery color scheme. I am open to new animals and themes too!

So here it is the 'Sea Creatures Series'


Related Posts Plugin for WordPress, Blogger...